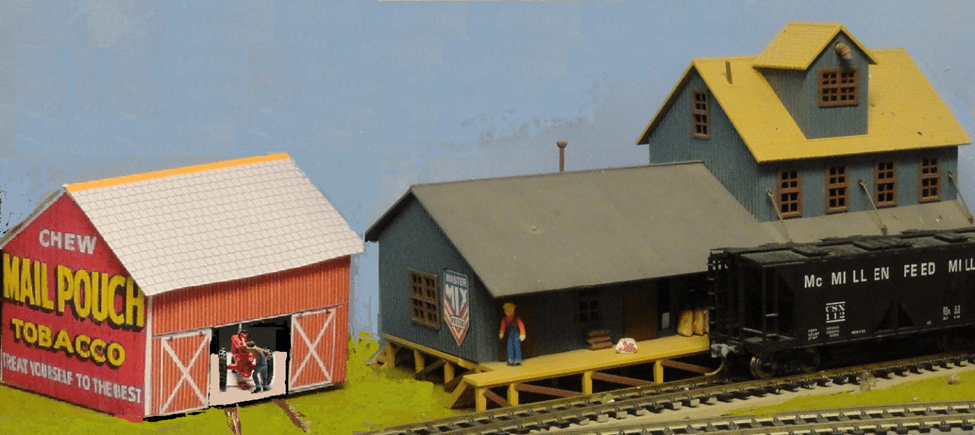
Maybe I should have entitled this chapter “99 ways to have fun on your room sized model RR layout without running a train”. Imagination is a wonderful thing; hopefully my writings can help to stimulate yours. I like to support my writings with photos. This photo has been modified with graphic software to re-proportion some of the items that I was never happy with, such as making the red barn larger and the tractor smaller than originally and moving it to the other side of the mill. Compare this image with photos on page 158. Yet I still think that we should be able to build a model railroad without using thousands of dollars.
After several years I had the layout running well, but no one to help operate it, so I tried a few experiments with industries of other stripes for a variety of operation. This is the chapter where I tell of some late ideas about having fun on the layout with little money. I discovered new tricks with some of my old industries that had been photographed and storied about earlier. This is how we may spend extra fun time and gain new peddler freight traffic from an old industry.
I now think that the modern way to distribute these writings is to post them on a web site of interest to model railroaders, for viewers to down load with their computer or even to print if they are interested. Is this place called the cloud? I guess I don’t know how that is done; perhaps I did not get close enough before retiring. I realize that some modern computers have no external disk connection ability – something I find shocking! after many years in the business.
This latest chapter is about taking a second look at some of our rail – served businesses and how we may be able to find new traffic on our room sized peddler freight operation. All the while trains can be running in the background. – Ray Lora fall 2018.
Making a construction site after the layout was finished.
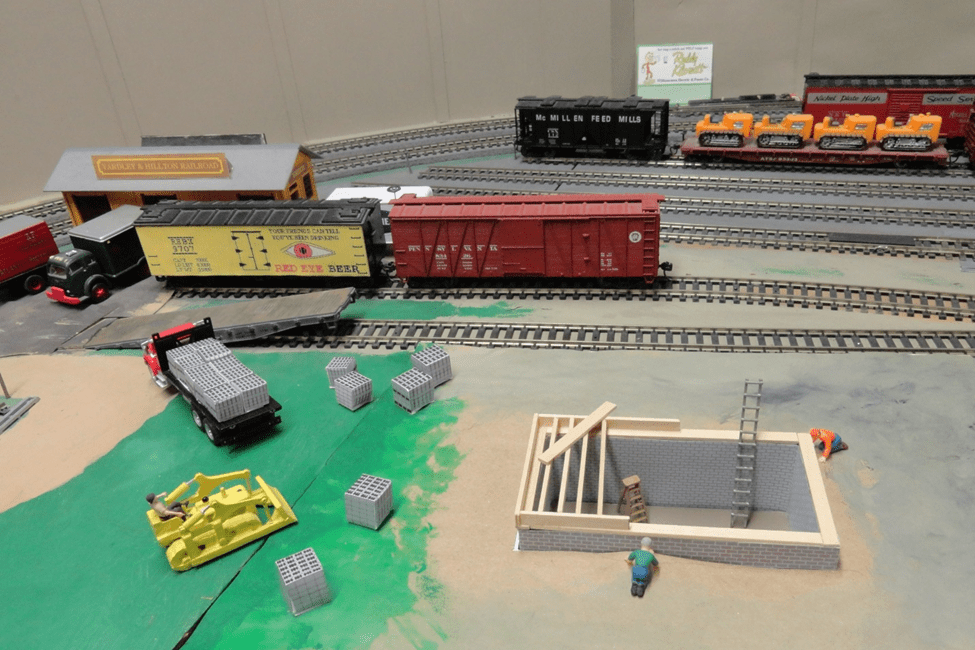
While browsing the internet I discovered palleted cinder blocks at http://www.HORailroad.com suitable for a truck load of concrete blocks at a new building construction site. They can be printed with your home computer, folded, glued and loaded to a flatbed truck as seen on the highway or stacked at the construction site ready to be laid in place by the masonry workers. I made several of these neat bits of detail fodder. Most buildings start with the basement (a hole in the table?) – But my layout has no space left for such things.
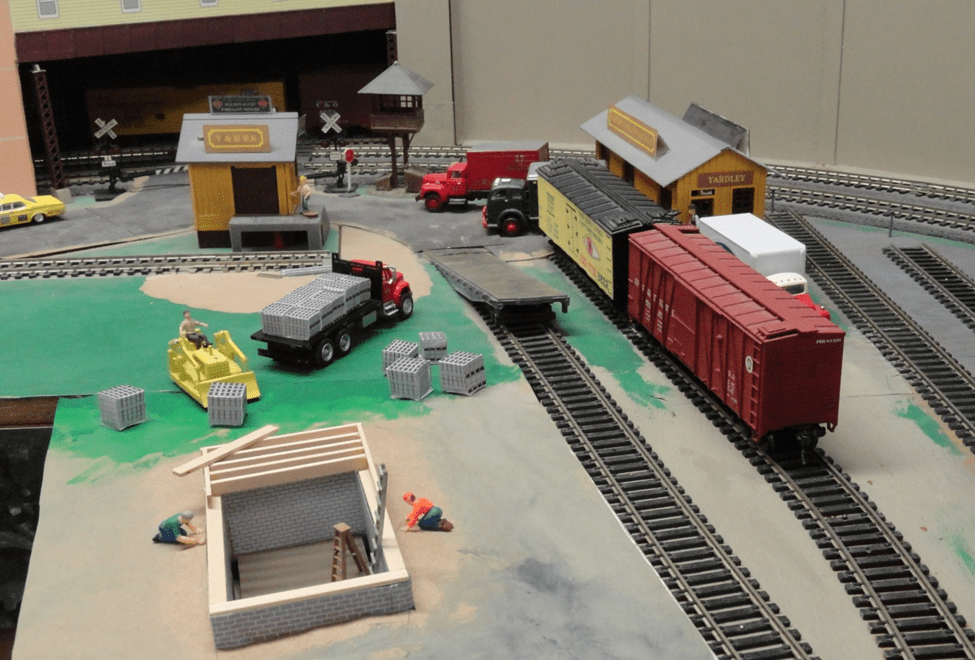
I needed some temporary layout space after the carpenter has packed up his tools and left. To make some new space I used a piece of 1/16 thick vinyl for a site shaped to fit the inside corner of my layout’s operation pit. I used foam core for the walls and covered the inside and outside of the walls with printed paper ‘concrete blocks’ of my own design with the Windows Paint program. I cut a hole in it to allow this ‘basement’ to hang below layout level. (Taking my modeling ‘over the edge’!) I lined the walls with foam core and used the cut out portion as the basement floor for this ‘building under construction’. The vinyl base was covered with brown paper bag material and painted with acrylic paints to represent green grass and dirt. The foam core walls were covered with printed paper ‘concrete blocks’ and capped with scale 2×8 wood sticks for floor joist – more building material is expected to arrive soon. The shot above shows this idea in the corner of the operation pit between the tiny Holden City Freight Agent and Yardley Freight Station tracks. There are two more pics on the next page showing how this worked out. The photographer has found this trick in two corners of the operation pit.
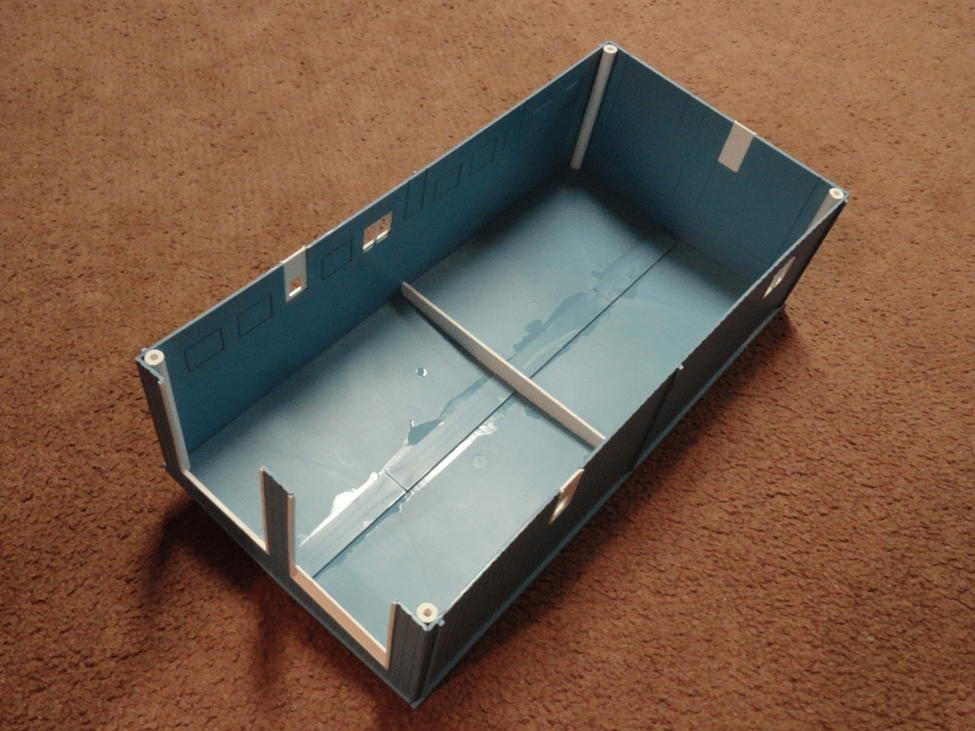
Building the diesel house for Yardley
After finishing the ‘basement under construction’ project using more than the last square foot of vacant geography on the layout, I felt that if I rearranged some structures I could have a modern diesel engine house and I needed a project to busy my fingers for the winter. I had enough sheet vinyl stock to build the structure but I wanted to try a kit built. I bought a modern diesel house kit by Pike Stuff because I thought it would save some time. Maybe it would have been better to scratch build after correcting the short comings of the kit’s design. There was lots of internal bracing required that should have been included with the kit. I think the design – if built with just the edges provided for glue contact, one could not move the structure without it falling apart! So I built it with added internal bracing (the white material in the illustration below) taking several days to allow glue sessions to dry strong. I used liquid plastic cement and thick wall plastic tubing in the corners mounted at just the right height to help support the roof and a homemade brace across the center to secure the roof to the walls for much needed strength. Now my building is strong enough for light handling.
Considering 3 temporary locations for the new diesel house at Yardley
On the turntable pit:
After the new kit built engine house was built I had to think about where to put it. I considered three locations. This story evaluates all three. I tried fitting it atop the turntable pit using the two turntable approach tracks as stall tracks in the new building. This location would disable the turntable. Just how valuable is a turntable with modern diesels?

Test fitting it by setting it loosely on the turntable bridge. It looks like this experiment will work – let’s call the landscaper and get this project moving. My landscaper uses brown paper material (about as cheap as you can find). He used a large sheet of heavy brown paper (seasonal leaf disposal bag) to pave over those good working radial tracks and the Turntable Bridge and pit. After cutting the paper to approximately the correct size it was soaked in water and hung it up to dry overnight. This caused some wrinkles to form; I did not want it to be real smooth. Next was acrylic water based paint for some color. I used a couple sheets of this paper to hide existing tracks that will be used again after the camera man leaves.
This placement puts the diesel house on the paved over turn table pit. After all – this is a temporary experiment for the camera man in an attempt to fight cabin fever in the dead of winter. Eventually before spring all this paper will be thrown away.
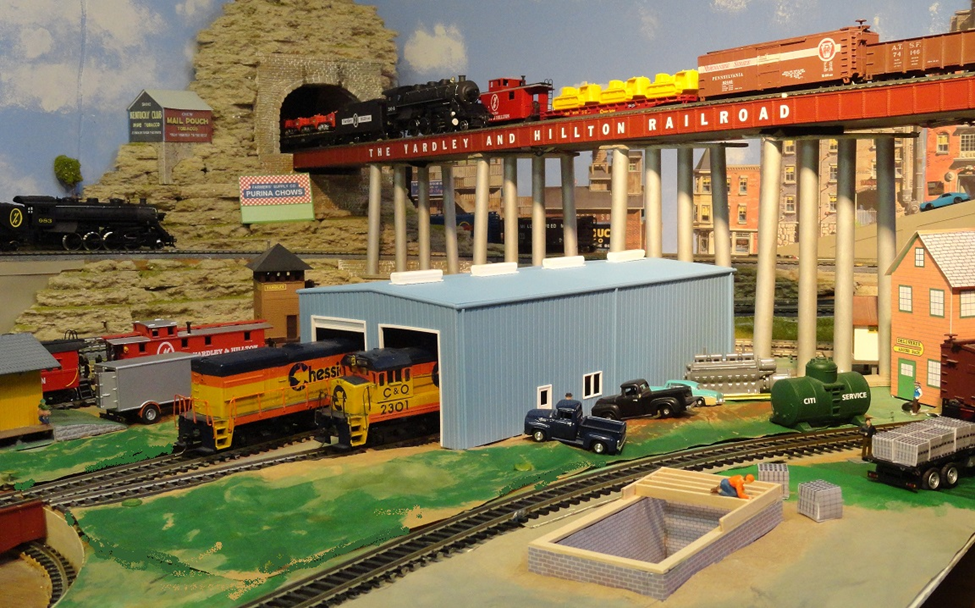
I tried placing the new diesel house at the turntable pit with the roundhouse, water tower and coal dock removed. I temporally stored them in the rafters of the train room. I took several photos during this exercise. I used a large sheet of brown paper to cover the turntable pit and roundhouse spur tracks to hide them from the one-eyed camera. This space now has a road connecting the Underhill Fabricating facility to the caboose stores building which crosses a new rail spur to serve new industries. We discovered new geography behind the diesel house.
Here we see the bulldozers are still working the grading for the road and rail bed behind the new diesel house.
Old Freight House location:
The first place I tried the new diesel house was at the former freight station in Yardley leaving us with no freight! I used the two original tracks, the station track and an end ramp track after a slight realignment to fit the diesel house door ways. This location is probably too close for comfort to the freight agent station at Holden. But we can get 2 or 3 diesel units in for servicing.

Developing Yardley Industrial Park:
This is the second spot considered for the location of the new diesel house. There is no turntable. Really, a wye is just as effective in turning equipment around and cheaper if you have the space.
I thought about modernizing the Yardley locomotive facility with a nice new diesel house, but I did not have much of a place to put it. With the advent of diesel locomotives that run backwards equally as well as forward real railroads sometimes pave over the often troublesome turntable pit. I wondered what would happen if I paved over mine! Now with the camera in hand we will both learn as I try this experiment of paving over the pit!
My layout needed more industrial space and this new found real-estate could bring new industries to the town of Yardley that never had many. I guess Yardley had so many railroad facilities there was no room for industry. But after taking over a hundred hours to build my roundhouse and turntable that works, I am not about to tear it up, maybe we can fool the camera with temporary scenery for this project. The local real-estate developer has lots of ideas. He was thinking about a road way connecting the Underhill Fabricating Co. to the caboose stores house in the yard with a crossing at grade over the new industrial spur track. Eliminating the roundhouse could reveal valuable real estate. Development may come fast.

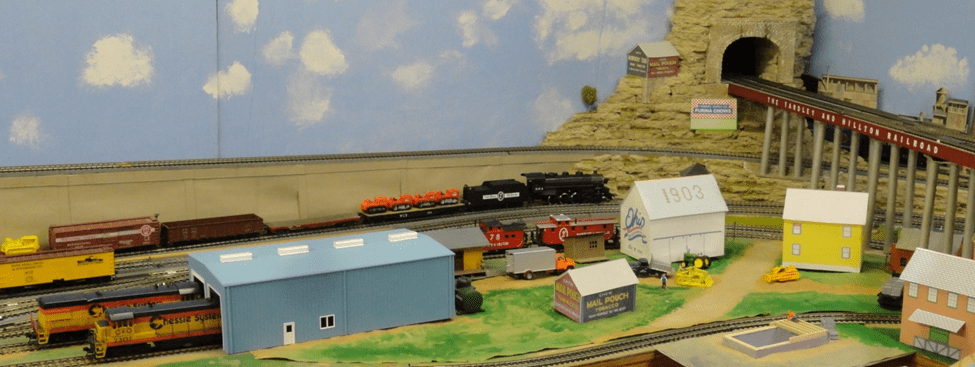
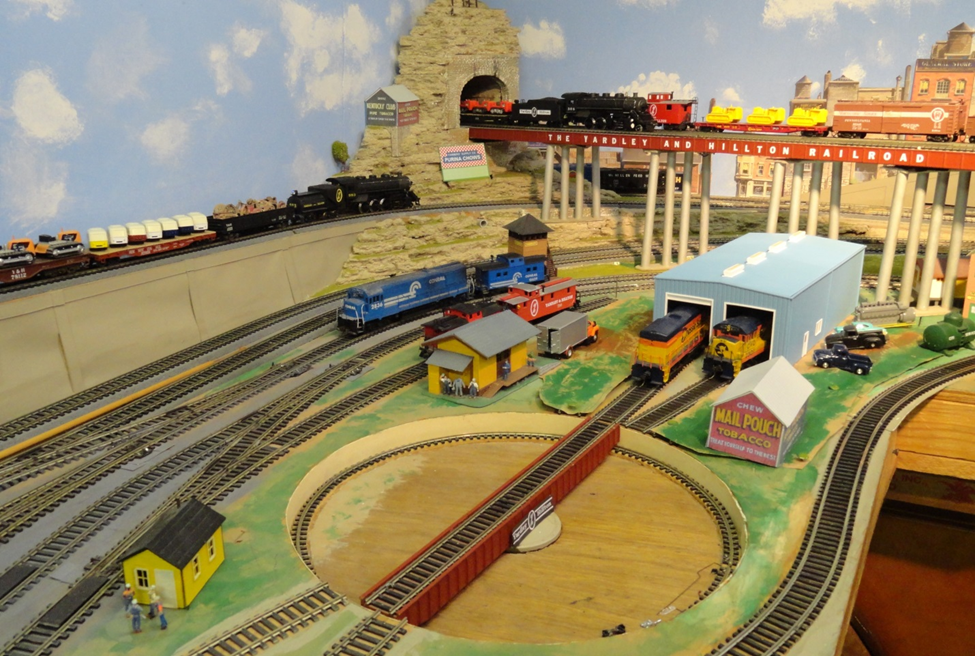
Here we see how the industry spur track may work at the new Yardley Industry Park at the former engine roundhouse facility. We see some development happening already, the two bulldozers are tending the grading, there is a dump truck of roadway material and things are moving right along. Both the Ohio Barn and the yellow house are homemade with the computer and printed on card stock paper. Here you can see where my heart truly is – with steam locomotives, farm tractors & bulldozers. But I realize that diesel locomotives are here to stay.
On the next page we see the spur track is laid and ready for final ballasting and the track switch to be cut in and connected soon. For benefit of the camera man I used structures that I already had on hand. Some of those buildings are not suitable as industrial sites served by rail or truck. There is a diesel house, rail spur to serve new industry, roadway grading, and a basement for a new building at the corner of the operation pit. This industrial park could have industries served by both rail and highway trucks from the now dirt cross road. There is room for the new rail spur to serve industries of at least two cars capacity. But I don’t think I will cut the track switch in – after all this is only a temporary thrill for the camera man. During this experiment I learned something I probably already knew – that diesels take less geography than steam locos with their special handling. I also learned about putting an operator inside a bulldozer; see my story about the Cat Bulldozer on page 134.


We got a new bulldozer for this job but he got here too late to get in the story pictures.
Stall tracks location:
Here we study the third location for the new diesel house. The turn table is still viable. Let’s explore new industry uses for the geography of the former round house radial stall tracks.
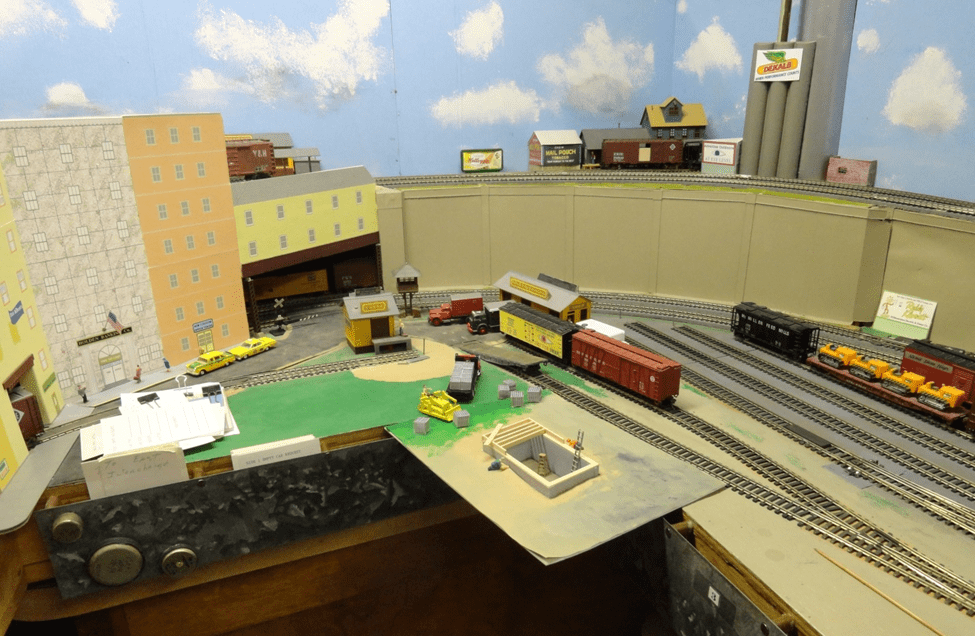
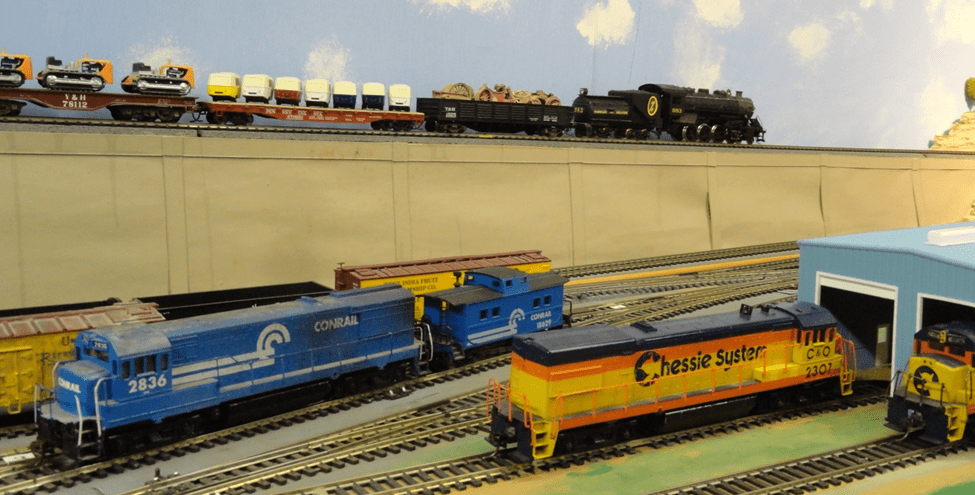
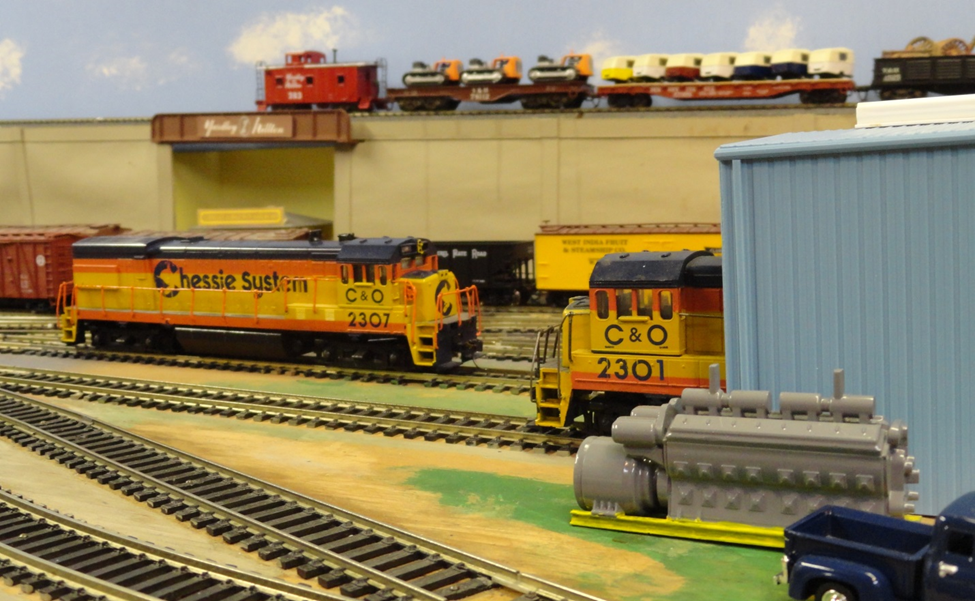
This distant view shows the diesel house on stall tracks 2&3 of the former round house. The Mail Pouch barn is out of place and should not be in this picture, shame on the photographer’s carelessness. This arrangement gains no more industrial space. It seems to waste space used by two approach tracks to the turntable. Maybe we could eliminate the caboose stores building and its short runaround for really modern times. The Conrail units are on the classification drill track near the Yard Master’s Tower. I have very few diesel road locomotives, it seems that I like steam better and I have little interest in diesels. The steam powered train in the background is on the mainline coming down from Hillton. There is more traffic on the big bridge at Hillton.
Most of my layout pictures show steam locomotives because that is what I have the most of. I guess this is because I remember them in operation as a youth. And for a small layout, one does not need large locomotives. Real railroads had more 2-8-0 Consolidations than any other wheel arrangement. Sometimes large articulated locos need more clearance room than a small layout can provide. A good Consolidation should pull 8 cars up my hills and Hillton can’t handle a longer train without a lot of jockeying around.
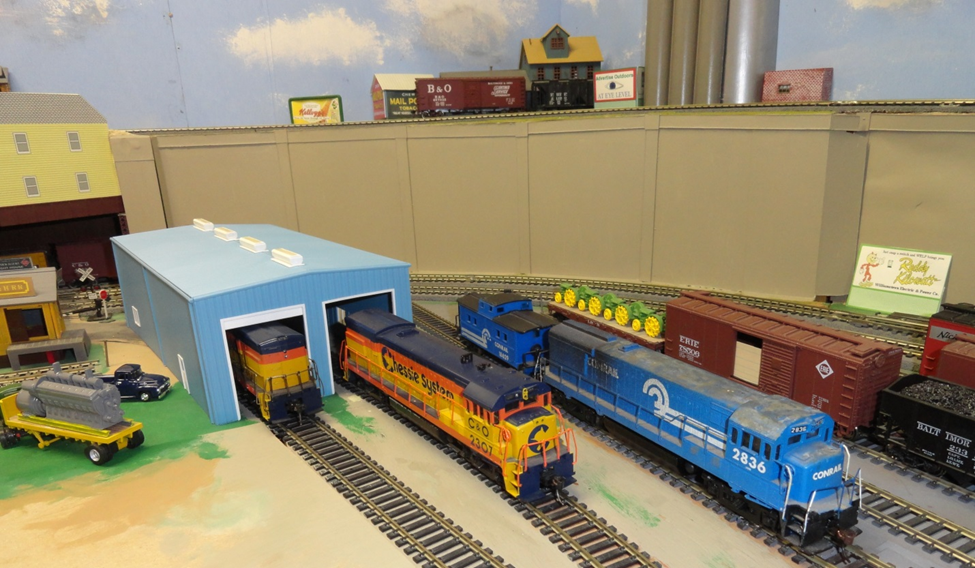
There is a lot going on at ground level in this view. At the very far right is a box car spotted at the Underhill Fabricating building. A truck load of concrete blocks and the new basement construction project can be seen in the corner of the layout operation pit, employee’s vehicles are parked at the diesel house. This photo has been retouched to hide the edges of the brown paper.
This exercise in layout change has been interesting; I had no intention of making these changes permanent but I wanted to see how things in my yard and engine facilities might work for a model railroader of the younger generation who may not understand steam locos and turntables. And to take a few pictures to share with the guys who like trains but have no interest in steam locomotives because they have never been close enough to smell the coal smoke or feel the heat when up close. I built my classification yard and engine facilities after having studied John Armstrong’s “Track Planning for realistic Operation” probably the bible of model railroad layout design, and included most of the features he identified as requirements of a small engine facility. Modern designs use a Y- track not too far away to turn equipment which is fun to use. I feel sorry for these modern time hobbyists who can’t see cabooses in today’s railroad operation. I realize that modern communication to the dispatcher with radio is wonderful and the end of train device that can apply brakes from the tail end is an improvement over the caboose and the two man crews has no need for one. I really miss the caboose. Ray Lora spring 2016.
Bull dozer with operator
I had a couple Caterpillar model D5GXL bull dozers by Norscot that I had found at a train market. They came mounted in a neat little display case. I thought I might use them in close-up pictures of a construction operation. I put a slight bit of tan weather with acrylic dry brush to the crawler tracks and bull dozer blade. I thought I should put an operator in one of them for more of an action scene.
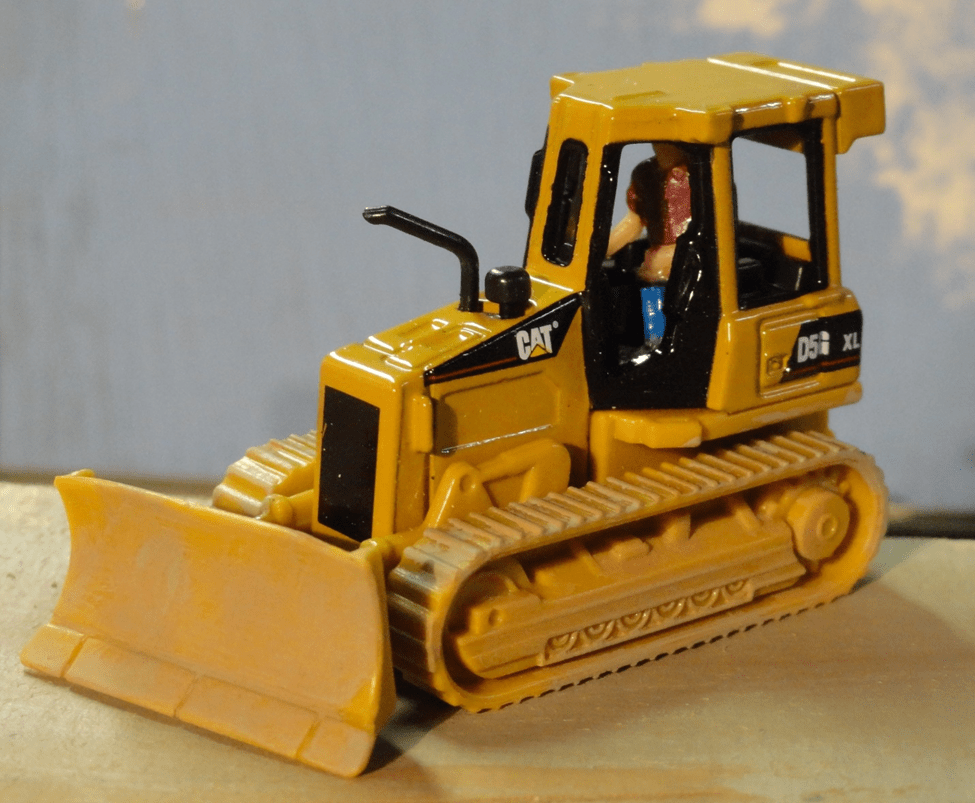
I used a standing figure that I found in my assortment of folks that looked like it could be an operator with a little cut-and-fit work. Disassembly was easy because it was held together with screws. It was reassembled with the operator now with no knees and thighs to be held to the seat with Walthers Goo. However I had trouble getting a good close picture that had proper light and focus. He seems to set too tall in the seat making it difficult to get enough light on his head. I wondered if it was that the roof was so close to his head? It seems that I have difficulty with focus or glare off the subject’s gloss finish. It seems that the camera wants to focus on the sky board background; I still want a good close picture of my operator in the bull dozer. So I tried another photo session after a bit more weathering and lowering the operator in his seat by removing him from the seat and cutting him off above the waist and re-gooing him to the seat. About all that is left of the original operator is his shins, chest and head! Note that he has bent the exhaust pipe to get the noise away from his face. These pics were taken on the work bench with a clamp lamp, a hand painted ground board of card stock, and the homemade sky board seen elsewhere.

Now he sits not so high in the cab and I am a lot happier with my results.

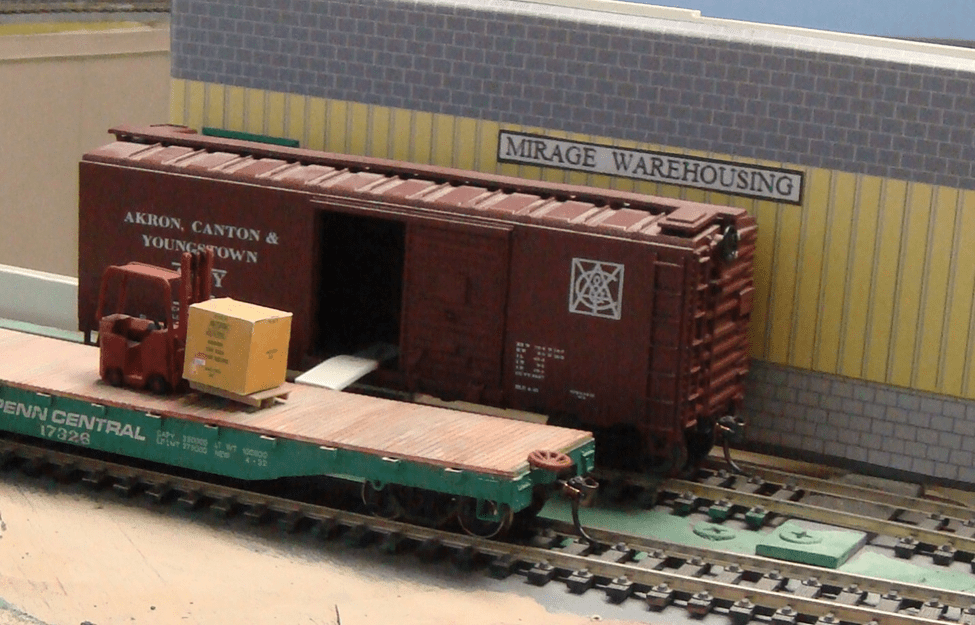
Loading two boxcars from one warehouse door
The loading of two boxcars from one warehouse door was done in large cities where space was scarce and freight traffic was busy. With two parallel tracks along-side of the ware house door and temporary steel bridge plates between the boxcars; two boxcars with both doors open could be loaded from one ware house door by working through one car into another. I have seen photos of this practice probably in the 1930s. In those days lots of freight house work was done with man power and two wheeled carts.
Locally I remember the feed mill where my uncle worked when I was about 10 years old. They used a steel plate about 3 feet wide and about 5 feet long to lie between the opened boxcar door and the sliding door on the side of the mill. This was used by men with two wheeled carts for transporting sacks of grain or fertilizer into the mill for storage or use.
I wanted to illustrate this concept on my layout – but with a boxcar on the near track it would obscure a good view of the action. So with a bit of imagination (x-ray vision?) consider the Penn Central flat car to be a box car. And that we are working through the first car (boxcar) with the fork lift to get to the second car, (flatcar) both box cars would have both doors open. Consider the fork lift on the flat as if it was on a wall-less box car.
To get this photo I used the camera on a mini tripod about 13 inches away from the boxcar. The Mirage Warehouse is a home – made flat mounted on 90 degree hardware angles at the layout edge.
Scraping a steam engine boiler
I wanted an action scene at the scrap yard in Hillton. This is my version of a partially cut up steam locomotive showing the many tubes in the boiler. This is another place that won’t scale properly with my shaky hand. I had a large bundle of thin plastic tubes from an old sun shade formerly used on the back porch. I thought those tan colored thin plastic tubes might be suitable as rusty flues in a scraped boiler. I used the computer to make a printed grid for uniform spacing of those many flues. I used sheet vinyl for the flue sheet because it is easy to work with a file and a drill. I temporarily glued two flue sheets together back to back and the printed grid was glued to the stack, then all the holes were drilled through everything, the paper discarded, and the drilled flue sheets were separated. Black and tan paint was brushed with water base acrylics. As it turned out my flues and the sheets were quite a bit oversize.
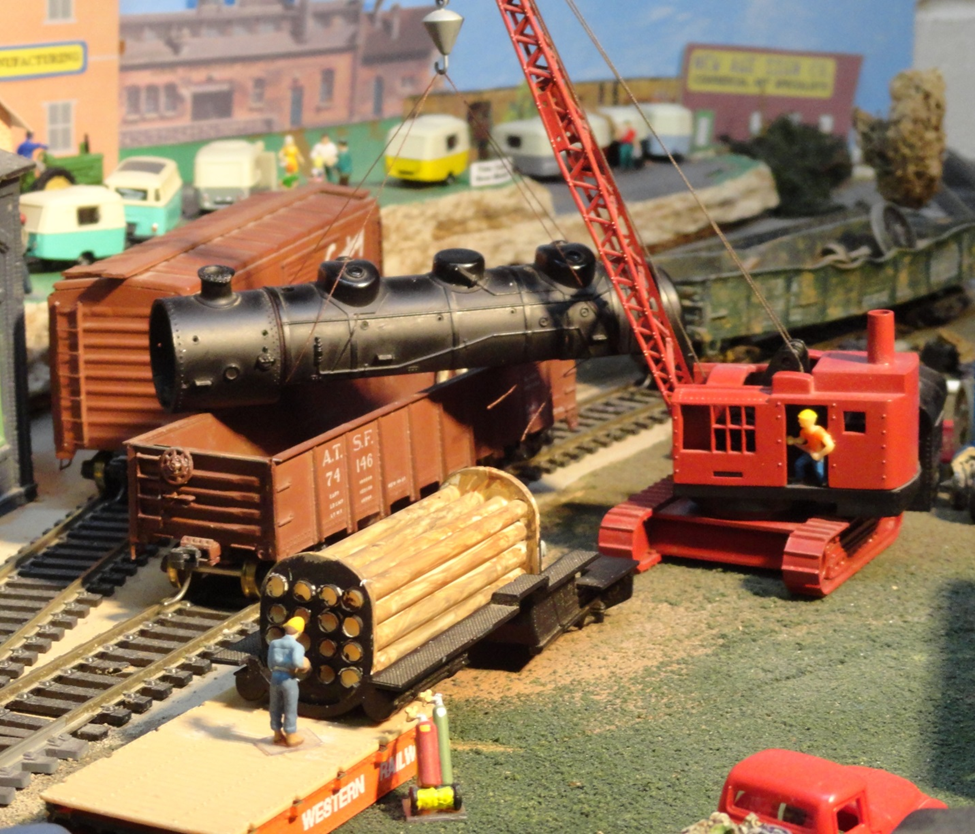
The torch man appreciates the old flat car work platform to keep up out of the mud. This is a view of the smoke box flue sheet and some (not nearly enough) oversized boiler tubes, the locomotive wheels have been shipped out already, the cab has been removed intact. What is hard to believe is that the top half of the boiler with sand domes still in place is being lifted by the crane into the gondola in one piece!

This view shows the Y&H Head Office building in the back ground, along with the WREX shop and the Crest Mount travel trailer factory. We see the workers acetylene tanks, rusty boiler tubes, evidence of other scrapping jobs, and the crane at work in the Hillton scrap yard.
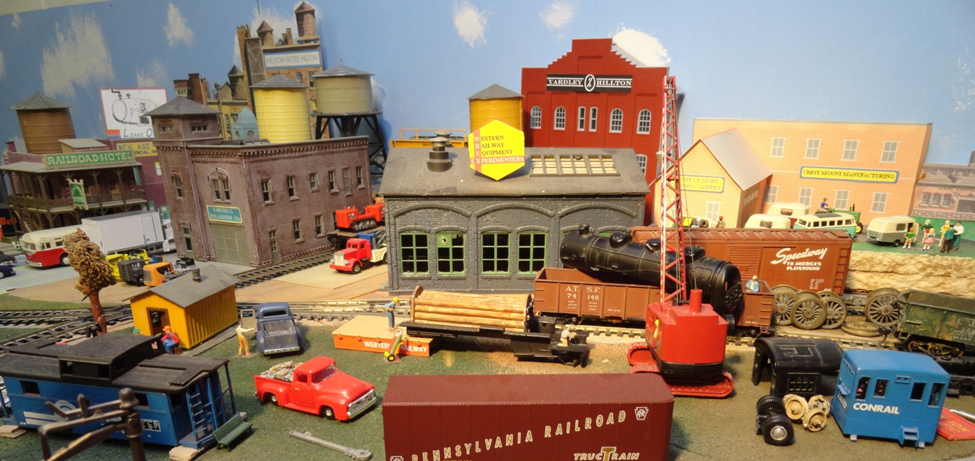
Seen above are three action views of the scrapping of a steam locomotive under the flood light for the cameraman. This is where the steel came from that built the bridges for our interstate highway system. This boiler tube project took the better part of three days and is rather crude but I wanted to show the younger generation how very many tubes were inside of a steam locomotive boiler even though they ended up quite oversize. I guess my scratch building abilities are unable to keep up with my imagination.
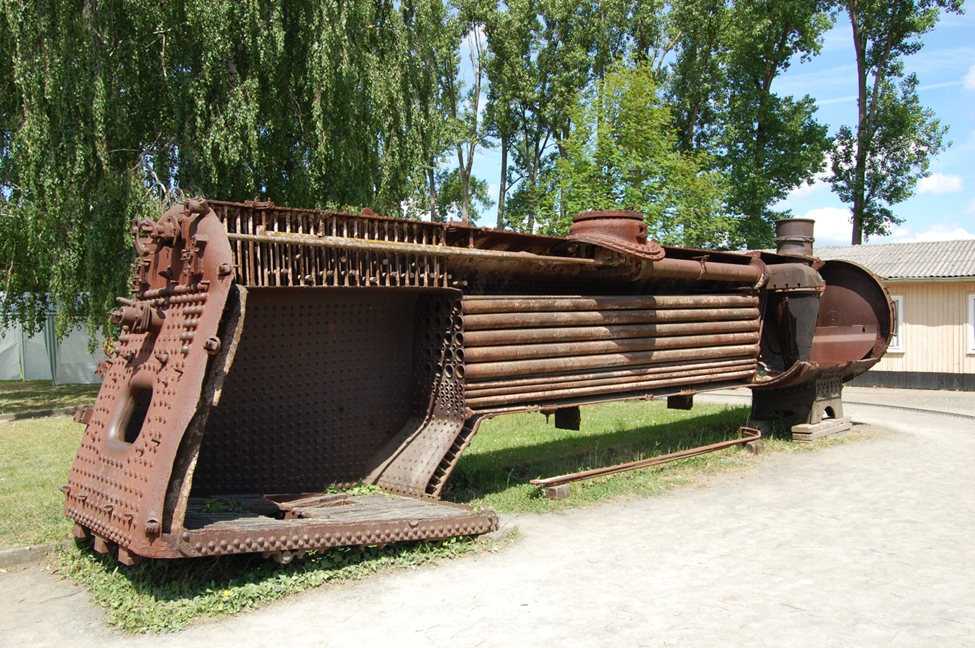
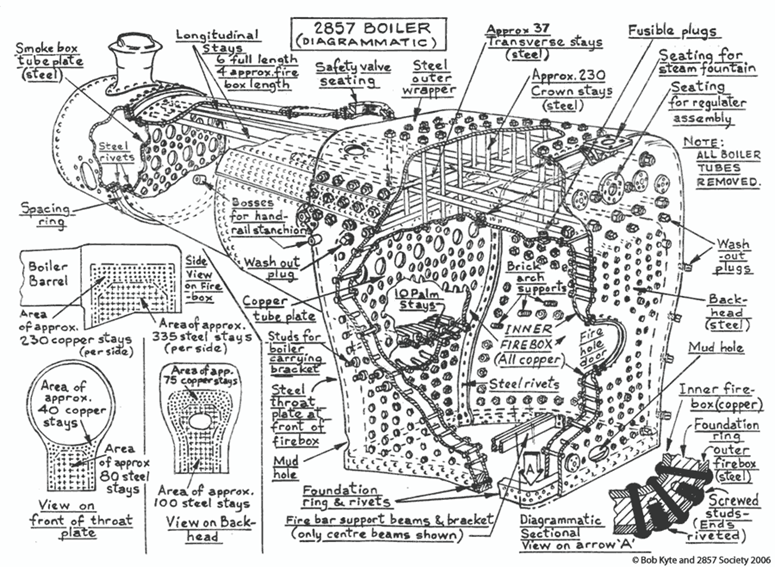
Stay-Bolt Study
This picture was taken at the Illinois Railway Museum in Union Illinois about 1980. It was a wordless outdoor exhibit that I found very informative. It is a cut-away view looking toward the cab of probably a consolidation. It shows how the fire box was surrounded by water. The flues are not shown here as they went with the cutaway. The fire door is just visible in the center of the firebox. It offers an interesting view of an old steam locomotive with the boiler cut away over the fire box area. We can see a few of the hundreds of stay bolts required to hold the thing together against the steam pressure. They hold in all directions as confirmed with the horizontal bolts (just the ends are showing above the crown sheet) over the fire. I think the green paint was just to slow the rusting for this display.

There are more views to study; take “Stay Bolts“ to Google. There are all kinds of examples even some of explosions. I have included a couple examples on the next page. With Adobe PDF viewer one can magnify some pictures and drawings for a better view.
Moving the ashes of a burn pit
Disposal of trash must be a big job especially for a big city. Today there is a garbage train that runs regularly on the Norfolk Southern and the CSX through eastern Pennsylvania. I recall an operation in the 1970s to take the ashes of an old burn pit from New Jersey to a strip mine land fill just north of Salem in eastern Ohio. I thought I could illustrate that story on my layout. As I recall, the township trustees permitted up to 200 tons per day of this material to be dumped and buried in an abandoned strip mine a short way from town – the job lasted several months although they seldom received more than one car at a time. The local team track was used as a load transfer point for this job.
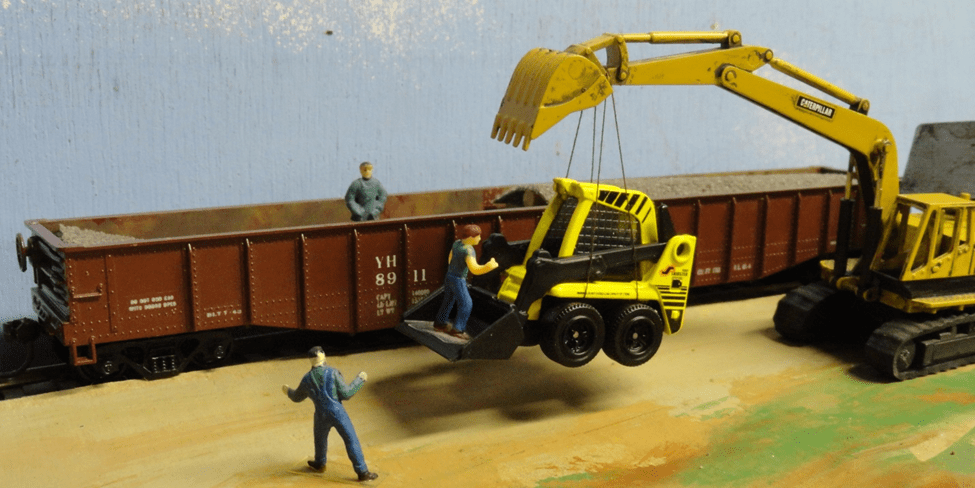
They tried to use a big back hoe to empty the gondola but that did not work well, too much hand work inside the car because the back hoe could not clear the corners well. A small nimble front end loader – probably a Bobcat did a much better job, it could turnaround within the walls of the car, and was light enough to be picked up and put into the car by the big crawler mounted back hoe. The front end loader could easily dump into a truck parked alongside the rail car.
We must start the story at a model train flea market where I was able to find the large crawler mounted back hoe painted like Caterpillar and a small front end loader like a bobcat in HO scale – both are required for the story, (I was glad that I found two) for this exercise for the camera.
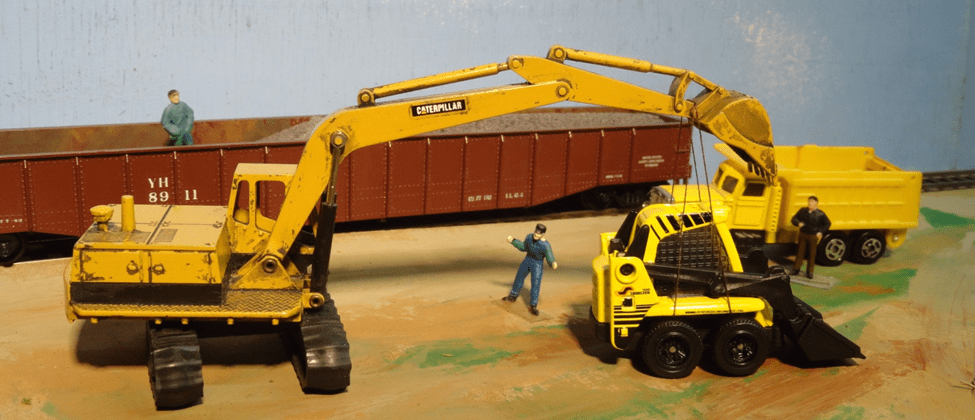
With the long reach of the back hoe we can lift the bobcat into the gondola with a rope sling. The man in the car will disconnect the rope sling and help clear the corners, the ground man is signaling the back hoe operator, and the truck driver with the empty truck is ready and waiting for a load.
This story confirms the value of the short wheel base of the bobcat that allows for it to turn around within the walls of the gondola – sometimes bigger is not always better, and how the RR team track can be used for all kinds of strange chores.
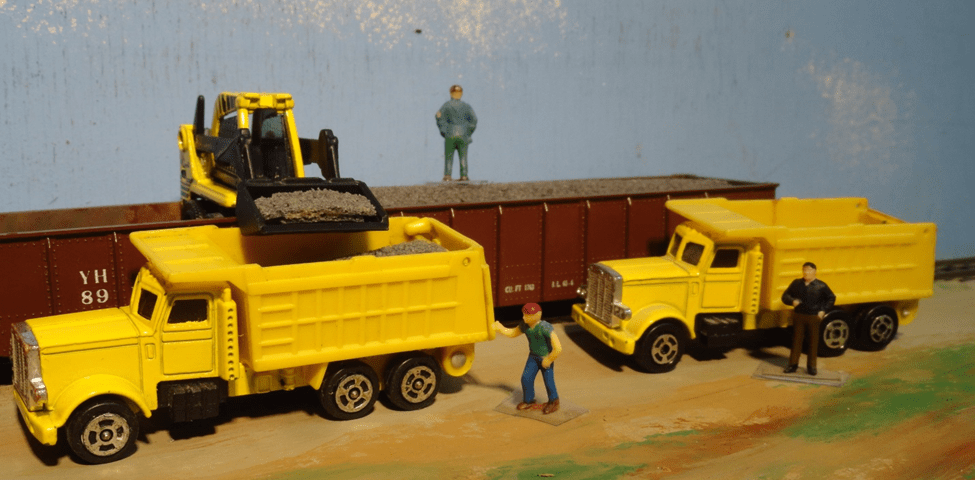
Unloading the gondola is well underway, the first truck driver is checking his tailgate, and the second driver is waiting in the wings. The man atop the carload is observing.
This is an overall view of the operation. It is good to have several trucks for the job because turn-around time is over 40 minutes for a trip about 5 miles from town.
Operational practices before OSHA
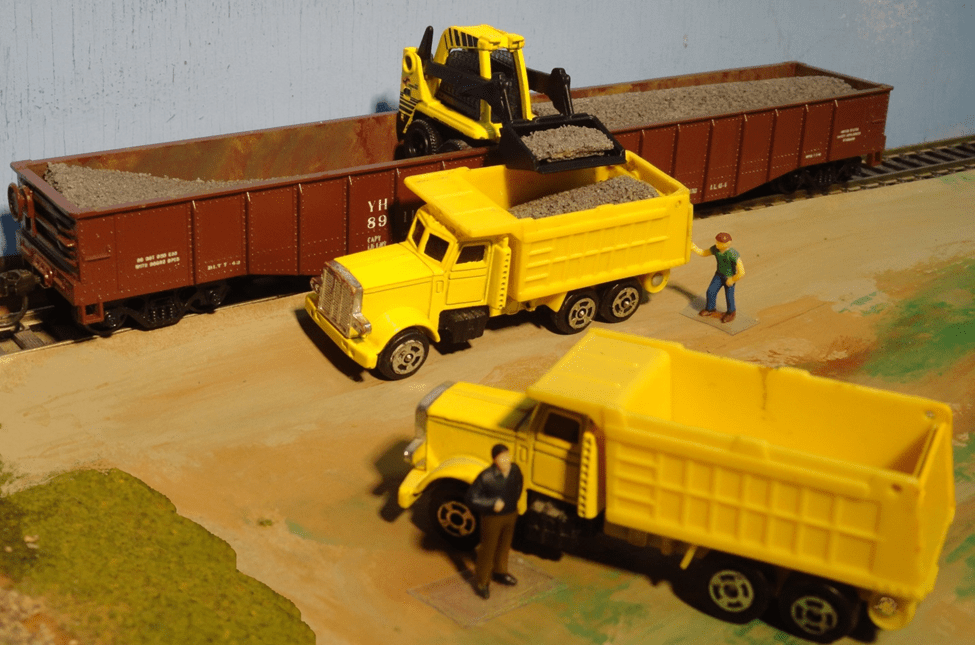
The confident bobcat operator is hitching a ride into the gondola! Now days if OSHA would see this – the job would be shut down!
After the layout is finished it can be used as a test track for hours of break- in running for a locomotive. Or it can be used to set up a scene to photograph in support of a story. I temporarily removed the Love coal tipple and the John Deere dealership to use the space for this photo adventure. The hardest part of this job was the tying of the brown thread to make a suitable sling for lifting the front end loader into the rail car, with my fumble fingers; I spent nearly 3 hours on that chore. The car is an Athearn 50 foot gondola that has been stretched to 62 feet, by the sectioning of another car and adding it to this one, then it was spray painted and decaled for the Yardley and Hillton in November of 1989. The load material was formerly underlayment for kitchen flooring stripped of one layer of Mylar film. The photo was taken in April 2016 at Hillton Junction not at the team track. I was surprised that the front end loader was still too long to set crossways inside the gondola (maybe it is a bit oversize). I have two bobcats; one has been shortened about a half inch with the bench grinder in the garage to fit cross ways inside the gondola. I now wish that I would have painted the bobcat bucket yellow but disassembly required drilling out a couple rivets and then it would want to fall apart. The weathering on the back hoe accentuates the Caterpillar Yellow with its hint of tan color. The placement of workers adds meaning and action to the story. All totaled I have probably spent over 12 hours on this venture including modifying the models, photographing and writing, setting up the scene with painted card stock ground board (to raise the surface to rail-head height) simulating the dirt paved ground at the team track. I used my sky board background from another project to hide the electrical outlet on the wall.

Leave a comment